All Categories
Featured
Table of Contents
- – Replacement Rv Awning Anaheim, CA
- – OCRV Center
- – Rv Furnace Repair Anaheim, CA
- – Rv Repair Near Me Anaheim, CA
- – Rv Refrigerator Repair Anaheim, CA
- – Motorhome Roof Repair Anaheim, CA
- – Rv Repair Near Me Anaheim, CA
- – Rv Electrical Repair Anaheim, CA
- – Rv Repair Near Me Anaheim, CA
- – Motorhome Repairs Anaheim, CA
- – Motorhome Repairs Anaheim, CA
- – Awning Repair Rv Anaheim, CA
- – Rv Furnace Repair Anaheim, CA
- – OCRV Center
Replacement Rv Awning Anaheim, CA
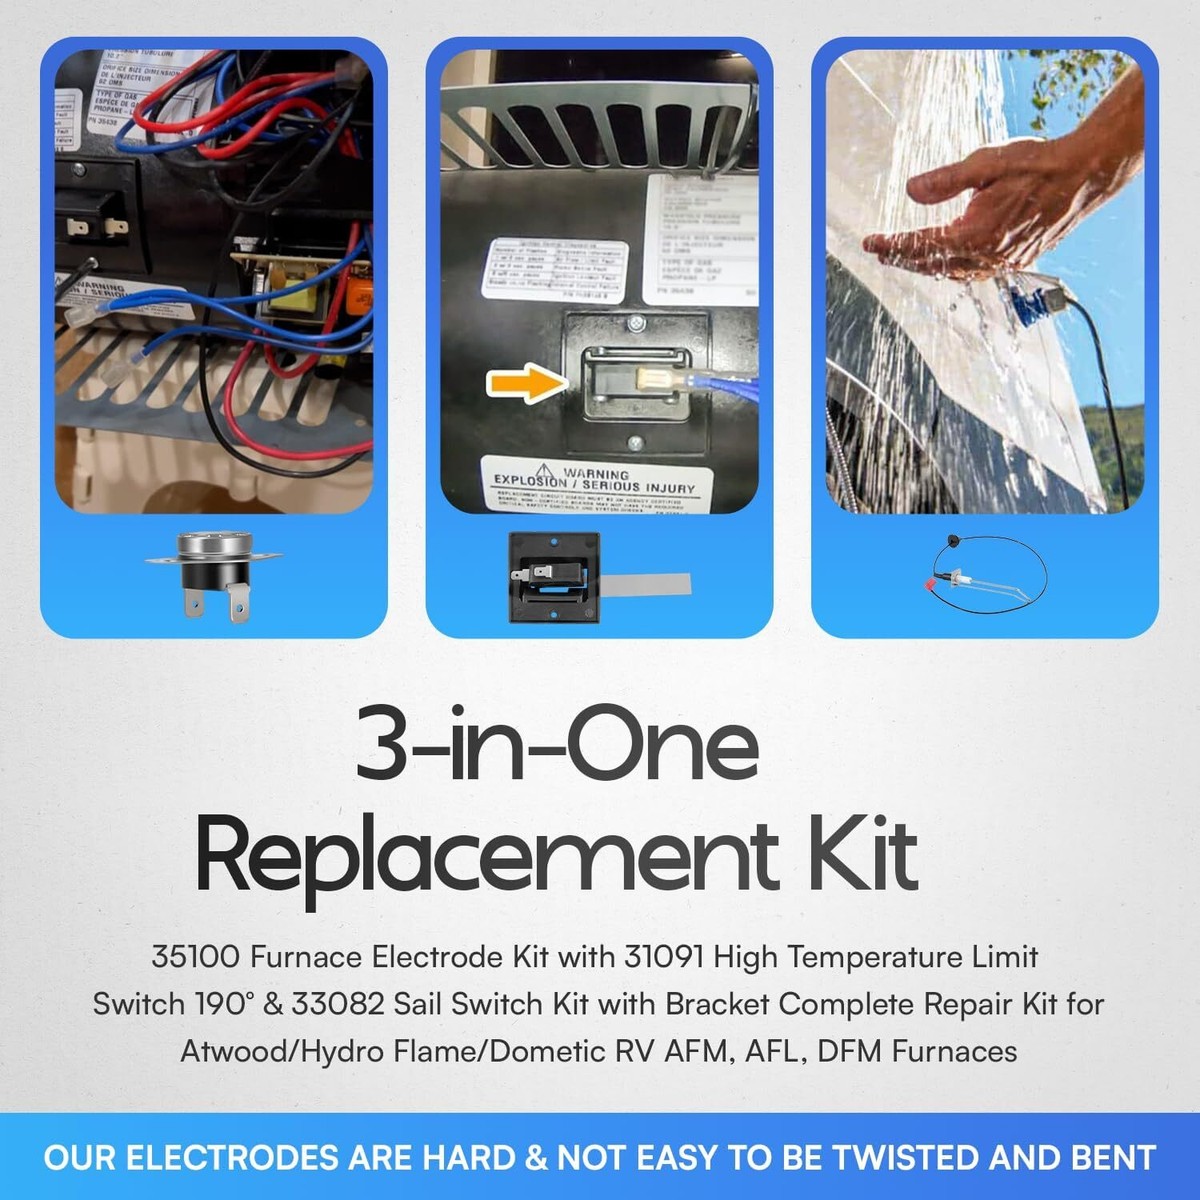
Get rid of these 2 screws, and after that the sail button ought to come out. In my case, it was instantly evident that the button had particles between the sail and button contact.
Examine/Clean or Change Cruise Change I can have just cleansed the switch and reinstalled it at this moment, and we likely would have been great. Yet, after undergoing the exercise to get rid of and reinstall the heating system, I decided the very best strategy was to place in the new sail button.
Guarantee you place the sail in the exact same direction as how it was gotten rid of. Re-plugin the wires to both terminals similarly they were separated. Vacuum Furnace Location. I very recommend clearing out the heating system location while you have the heater out. The major problem that besieges the sail button is floating particles that discovers its means right into the blower follower.
Rv Furnace Repair Anaheim, CA
Cleaning the location will certainly help delay this accumulation of dirt and debris. Reinstall Heating System to Decking. With job gloves on, turn the heater to the initial position, lift it over any type of limit, and placed it back into the recessed location. Beware not to kink any type of cords or strike the lp line.
Reattach the placing screws right into the heating system deck to protect the furnace back to its initial location. If your threading had yellow lp tape, replace the tape prior to reattaching the propane line. Otherwise, connect the gas line per the action of approximate torque the link had when the line was removed.
Reinstall Heating System Ductwork This is done in reverse order to exactly how they were removed. Make sure all ductwork is firmly affixed.
Test the Gas Connection with Soapy Water Open up the shutoffs to your gas containers. Use soapy water put on the propane link at the furnace and look for bubbles.
Rv Repair Near Me Anaheim, CA
I also examined the cooking area cooktop to guarantee lp was coming via the lines. Place the fuse into the correct port in the electric panel using the needle nose pliers. Evaluate the Furnace Turn the thermostat to "Heater" and raise the temperature level till the furnace blower fan comes on. You must hear the furnace spark within twenty secs approximately of the heating system's blower follower beginning.
We have actually discussed several of these in more information listed below. Your RV heating system thermostat is the major control factor that establishes when and just how much warmth will be delivered by the furnace. It lets you set the temperature level of your heating system, along with adjust it. Maintain your motor home heating system looking wonderful and neat by including a furnace access door in your set-up.
Rv Refrigerator Repair Anaheim, CA
Recreational vehicle heating system vents (specifically adjustable ones) permit you to customize just how much air circulation comes out of your furnace. They additionally supply additional safety by serving as a barrier between you and the resource of home heating; a must-have if you travel with kids or pet dogs. Much like an automobile, the furnace motor is what keeps your system running.
For that reason, it's vital that your motor is constantly in leading form. You can get all of these components via your local motor home heater or accessories store, as well as on internet sites such as Amazon. Several RV owners select to install their furnace themselves, while others select to work with an expert to do the job for them.
When purchasing your motor home heater, the first thing to do is to ensure it is certified with your version of recreational vehicle. Will it fit the alloted space? See to it you have actually determined this location greater than when to be on the secure side. If picking to set up the heating system yourself, the product's guidebook might come with installment instructions, or you can also locate a large range of video clip tutorials online to assist you.
Motorhome Roof Repair Anaheim, CA
The initial point to do is inspect if the gas is activated. If it is, then your RV furnace may be experiencing insufficient air circulation through the furnace, a bad lp shutoff at the furnace, or a poor regulator at the lp container. Assess your heater to make certain there aren't any blockages.
If your heating system hasn't been turned on for quite a long time, after that this is at fault for the odor. Enable the furnace to compete a little while and you must soon notice that the odor vanishes. If the heater is still producing a negative odor after this time, transform it off and guarantee there isn't a lp leak.
Depending upon your design of furnace, you may have a pilot burner. Modern recreational vehicle heaters have a direct spark ignition system that replaces a pilot light. If your pilot burner will not light or remain lit, then first ensure the thermocouple is located appropriately in the pilot fire. This issue may also be triggered by a poor regulatory authority at the propane tank.
Rv Repair Near Me Anaheim, CA
If this is the situation, then it's ideal to call your neighborhood RV furnace expert. Initially, inspect every one of the vents in your recreational vehicle. There should not be indications of soot on your exhaust air vent, so this might be telling you there's incorrect combustion, which is leaving unburned fuel as it is venting.
Camping is enjoyable, however no person wants to invest a cool evening without heat. Before you require your motor home heater, you will certainly intend to ensure it's in great running problem, since it is utilized the least in your motor home. Below are a few very easy motor home heating unit fixing tips and standard repair services, to offer you an aiding hand.
Rv Electrical Repair Anaheim, CA
If the heating system still does not run, try lighting a range heater. This will certainly guarantee the stove is obtaining gas. If the pilot won't light, examine to make sure you have gas. One other motor home heating unit troubleshooting pointer is: inspect the thermocouple. Make sure it is free from any type of crawler internet or insect nests.
If the thermocouple is negative, eliminate it and acquire one precisely the exact same as the one you are replacing. The thermocouple is an easy and inexpensive repair service. The price to purchase a new one is concerning $10.00.
The warmth works on 12V, not 110. Otherwise, maybe a tripped breaker or a blown fuse. If it's a stumbled circuit breaker, reset it. Change the blown fuse. Another fantastic recreational vehicle heating unit troubleshooting suggestion: if you see soot outside of the motor home by the exhaust vent, examine all vents.
Rv Repair Near Me Anaheim, CA
With these pointers and practical tips on fundamental fixings on your Motor home heating unit, you need to be able to repair and maintain your heating unit in tip-top shape. These standard repairs might be simply what keeps you from making an expensive phone call.
The last point any individual intends to listen to (particularly after they have actually made the purchase) is the feared information that there's a hill of repairs to compete with that might cost as long as, if not greater than, the RV deserves. If the obligations related to owning a motor home are new to you and/or you're searching for aid to improve familiarized with exactly how to utilize, take care of, and save your RV to obtain one of the most from it for many years to come while maintaining everybody risk-free, we can assist with that as well.
Many thanks for posting this-- I wish I never need to see it, yet the moment might come.
The furnace in your RV is very similar to the one in your house. There's not a great deal of upkeep that's required of it, but there are some points that you require to know to make it run more effective and for fixing objectives. Currently, the heating system in this one, this happens to be a 2003 Brave and we're gon na take this cover off below the behind and we can see that we've got a suv model in this one and we have actually pulled this one out as an example of what we have.
Motorhome Repairs Anaheim, CA
And the method the system works is when you have your thermostat established to the preferred temperature and it asks for heat, it's gon na experience the motherboard, which we see on this unit right here is gon na enter into below and it's gon na start the fan to start with.
It's gon na kind of tidy everything out. And what it's also looking for is it desires to make sure we have proper fan rate, appropriate voltage coming in.
Motorhome Repairs Anaheim, CA
And it's gon na be sitting even more like this beyond of it. We require sufficient fan speed and airspeed to raise this and you listen to that little hitting in there. What that's doing is it's stating, okay, I have sufficient airspeed, I have adequate voltage so whatever else is gon na work appropriately in here due to the fact that it's pushing this up and closing that circuit suggesting the voltage can go through and tell everything is good prior to it starts to light the heater setting up.
We have a thermal coupler or basically a temperature sensing unit. And what that does is if this gets also warm, then that's gon na again, open and claim, nope, we have troubles. We're obtaining also hot. We're gon na close the system down. The entire point will close down. And a number of points that you require to be knowledgeable about, on the within of your rig, you're either gon na have a plenum like this one runs the whole time the within and it's got the duct in the flooring much like you would certainly in a home or you're gon na have a series of what we call elephant vehicles, and they're the, trunks.
If you connect those vents up inside that motor home, then you limit the air flow. And that airflow after that indicates that this is gon na warm up, either our temperatures switch over is gon na close the system off or our sail button is gon na close it off. Very same thing with our corrugated pipes, if you start keeping things in your closets, below, and you start pinching those.
Once again, we're gon na obtain either overheating on this side or we're gon na obtain that sail button that is going to open the circuit and claim, nope, we can not run. If your unit isn't running, there's a number of things that we check out. The very first thing is you have actually got to see to it that you understand that these escaped a 12 volt system and you need at the very least 10.5 volts for this fan to go quick enough to open that sail button.
Awning Repair Rv Anaheim, CA
A whole lot of individuals believe that that's the case, yet it does not. So the first thing it does is it bows this in. It's gon na type of clean every little thing out. And what it's also looking for is it wishes to ensure we have correct fan speed, appropriate voltage can be found in.
And it's gon na be sitting even more like this beyond of it. We need sufficient follower speed and airspeed to lift this and you hear that little clicking in there. What that's doing is it's stating, alright, I have enough airspeed, I have sufficient voltage so every little thing else is gon na function effectively in here since it's pushing this up and closing that circuit meaning the voltage can undergo and inform whatever is excellent before it starts to light the burner assembly
Rv Furnace Repair Anaheim, CA
We have a thermal coupler or basically a temperature level sensor. And what that does is if this gets also hot, then that's gon na once again, open and claim, nope, we have troubles. We're obtaining too hot. We're gon na close the system down. The entire point will shut down. And a number of points that you need to be familiar with, on the inside of your rig, you're either gon na have a plenum like this one runs the whole time the within and it's obtained the duct in the flooring much like you would certainly in a home or you're gon na have a collection of what we call elephant vehicles, and they're the, trunks.
If you connect those vents up inside that motor home, then you restrict the air flow. And that air movement after that implies that this is gon na warm up, either our temperatures switch is gon na shut the system off or our sail button is gon na shut it off. Very same point with our corrugated hoses, if you start saving products in your cabinets, beneath, and you start pinching those.
OCRV Center
Address: 23281 La Palma Ave Yorba Linda, CA 92887Phone: (714) 909-1444
Email: [email protected]
OCRV Center
So once again, we're gon na get either overheating on this side or we're gon na get that sail switch that is mosting likely to open up the circuit and state, no way, we can't run. If your device isn't running, there's a couple of points that we take a look at. The initial point is you have actually got to ensure that you recognize that these run off a 12 volt system and you need at the very least 10.5 volts for this fan to go fast enough to open that sail switch.
Repair Rv Awning Anaheim, CARv Furnace Repair Near Me Anaheim, CA
Rv Furnace Repair Near Me Anaheim, CA
Rv Aluminum Siding Repair Anaheim, CA
Rv Repair Shop Anaheim, CA
Rv Repair Shop Anaheim, CA
Rv Awning Repair Near Me Anaheim, CA
Rv Blinds Repair Anaheim, CA
Rv Repair Shop Anaheim, CA
Rv Furnace Troubleshooting Anaheim, CA
Rv Furnace Troubleshooting Anaheim, CA
Rv Ac Repair Near Me Anaheim, CA
Rv Blinds Repair Anaheim, CA
Repair Rv Anaheim, CA
Rv Awning Repair Near Me Anaheim, CA
Rv Blinds Repair Anaheim, CA
Rv Water Damage Repair Anaheim, CA
Rv Specialists Anaheim, CA
Rv Furnace Repair Near Me Anaheim, CA
Rv Refrigeration Repair Anaheim, CA
Rv Repair Shop Anaheim, CA
Motorhome Repairs Anaheim, CA
Rv Refrigeration Repair Anaheim, CA
Rv Electrical Repair Near Me Anaheim, CA
Rv Fridge Repair Near Me Anaheim, CA
Rv Blinds Repair Anaheim, CA
Rv Water Damage Repair Anaheim, CA
Rv Repair Reviews Anaheim, CA
Motorhome Roof Repair Anaheim, CA
Rv Refrigeration Repair Anaheim, CA
Rv Awning Fabric Repair Anaheim, CA
Rv Furnace Repair Near Me Anaheim, CA
Rv Refrigeration Repair Anaheim, CA
Rv Awning Fabric Repair Anaheim, CA
Repair Rv Awning Anaheim, CA
Recreational Vehicle Repair Anaheim, CA
Rv Furnace Repair Anaheim, CA
Rv Aluminum Siding Repair Anaheim, CA
Motorhome Repair Shops Near Me Anaheim, CA
Motorhome Repair Shops Near Me Anaheim, CA
Rv Furnace Troubleshooting Anaheim, CA
Motorhome Repairs Anaheim, CA
Motorhome Repairs Anaheim, CA
Rv Repair Shop Anaheim, CA
Motorhome Repairs Anaheim, CA
Rv Ac Repair Near Me Anaheim, CA
Awning Repair Rv Anaheim, CA
Recreational Vehicle Repair Anaheim, CA
Rv Fridge Repair Near Me Anaheim, CA
Rv Refrigeration Repair Anaheim, CA
Rv Specialists Anaheim, CA
Rv Blinds Repair Anaheim, CA
Motorhome Roof Repair Anaheim, CA
Motorhome Roof Repair Anaheim, CA
Rv Awning Fabric Repair Anaheim, CA
The Rv Repair Centre Anaheim, CA
Rv Repair Near Me Anaheim, CA
Rv Aluminum Siding Repair Anaheim, CA
Motorhome Repair Shops Near Me Anaheim, CA
Local Rv Repair Anaheim, CA
Rv Specialists Anaheim, CA
Rv Awning Repair Anaheim, CA
Rv Awning Repair Near Me Anaheim, CA
Rv Refrigeration Repair Anaheim, CA
Rv Furnace Repair Anaheim, CA
Repair Rv Awning Anaheim, CA
Rv Aluminum Siding Repair Anaheim, CA
Replacement Rv Awning Anaheim, CA
Awning Repair Rv Anaheim, CA
Rv Furnace Troubleshooting Anaheim, CA
Repair Rv Awning Anaheim, CA
Rv Aluminum Siding Repair Anaheim, CA
Rv Refrigerator Repair Anaheim, CA
Motorhome Roof Repair Anaheim, CA
Rv Fridge Repair Near Me Anaheim, CA
Rv Awning Repair Near Me Anaheim, CA
Repair Rv Awning Anaheim, CA
Rv Fridge Repair Near Me Anaheim, CA
Near My Location Seo Plans Anaheim, CA
Around Me Top Seo Company Anaheim, CA
Rv Refrigerator Repair Anaheim, CA
OCRV Center
Table of Contents
- – Replacement Rv Awning Anaheim, CA
- – OCRV Center
- – Rv Furnace Repair Anaheim, CA
- – Rv Repair Near Me Anaheim, CA
- – Rv Refrigerator Repair Anaheim, CA
- – Motorhome Roof Repair Anaheim, CA
- – Rv Repair Near Me Anaheim, CA
- – Rv Electrical Repair Anaheim, CA
- – Rv Repair Near Me Anaheim, CA
- – Motorhome Repairs Anaheim, CA
- – Motorhome Repairs Anaheim, CA
- – Awning Repair Rv Anaheim, CA
- – Rv Furnace Repair Anaheim, CA
- – OCRV Center
Latest Posts
Senior Insurance Quotes Seal Beach
Montrose Repair Swamp Cooler
Universal City Evaporative Cooler Repair
More
Latest Posts
Senior Insurance Quotes Seal Beach
Montrose Repair Swamp Cooler
Universal City Evaporative Cooler Repair