All Categories
Featured
Table of Contents
- – Rv Roof Repair Near Me Eastvale, CA
- – OCRV Center
- – Rv Rubber Roof Maintenance Eastvale, CA
- – Rv Trailer Rubber Roof Repair Eastvale, CA
- – Motorhome Roof Replacement Eastvale, CA
- – Replace Rv Roof Eastvale, CA
- – Rubber Roofing For Rv Eastvale, CA
- – Replace Rv Roof Eastvale, CA
- – Rv Rubber Roof Repair Eastvale, CA
- – Repair Rv Roof Leak Eastvale, CA
- – Rv Fiberglass Roof Repair Eastvale, CA
- – Rv Rubber Roof Repair Eastvale, CA
- – Rubber Roof For Rv Eastvale, CA
- – Rv Trailer Roof Repair Eastvale, CA
- – Rv Roof Repair Service Near Me Eastvale, CA
- – OCRV Center
Rv Roof Repair Near Me Eastvale, CA
As you can see from the significant result of an improperly preserved seam in the video clip embedded over, any type of seams on Recreational vehicles need to be regularly looked for the honesty of the sealer. All you require apart from a putty knife to aid with the elimination of the old Dicor is a tube of Dicor and a caulk weapon.
Know plainly what is and is not covered by your motor home insurance plan, and ask exactly how to acquire the coverage you want, relying on its price. Where RV roofing leakages are concerned, it may depend on the means the damages took place. Insurance business Refute cases on the damage that occurs from leaks that are considered to be maintenance-related.
Dicor sealant that is broken like this from direct exposure to the sunlight and various other weather requires to be changed. It's a very easy and worthwhile task. A quick check of the sealer around vents, fans, photovoltaic panels, air conditioning unit, and antennas every 1 month or so maintains our recreational vehicle roof in excellent problem, preventing possibly pricey leaks.
Rv Rubber Roof Maintenance Eastvale, CA
Recreational vehicle roof leakages can be genuine troublers. Discovering just how to prevent them in the very first area is your really best protection against potentially significant damages to your RV, and even to your health and wellness.
Whether this is your very first time when driving or you're an experienced professional, we 'd enjoy for you to geek out with us!.
Rv Trailer Rubber Roof Repair Eastvale, CA
Having a recreational vehicle uses freedom and journey, yet it likewise comes with a reasonable share of maintenance obligations. Among the most essential jobs for motor home proprietors is preserving the stability of the roofing system. A leaky recreational vehicle roof covering can lead to comprehensive indoor damages, mold development, and even structural issues if left without treatment.
If not attended to, water invasion can bring about: Delamination of wall surfaces and ceiling By executing normal evaluations and recognizing exactly how to take care of motor home roof repair service, you can extend the life of your car and avoid costly damages. Before you can fix a leakage, you need to find it. This can be harder than it seems, as water usually travels far from the access factor prior to showing noticeable signs.
Check out the edges of the roofing system where it meets the walls. Inside the Recreational vehicle, look for staining or drooping in the ceiling.
Think about using a liquid roof covering: Mask off locations not to be covered. Mix and pour the finish equally throughout the roofing system.
Motorhome Roof Replacement Eastvale, CA
Use a flashlight to examine the indoor ceiling. Particles build-up can hold moisture and deteriorate materials (Eastvale Rv Trailer Rubber Roof Repair). Clean every 3-6 months, depending on use and storage space. Utilize a breathable RV cover or Outrig indoor storage space. Prevent auto parking under trees where limbs and sap can damage the roof. While several motor home roofing fixings can be DIY jobs, some circumstances need specialist help: Structural damage or significant roofing sagging Huge, covert leaks that are tough to map Complete membrane substitute Insurance-related repair work Discovering exactly how to execute a recreational vehicle roofing system repair service equips you to shield your investment, conserve cash, and avoid mid-trip disasters.
If you do not inspect, reseal, and repair your motor home roof covering consistently, you will wind up with some lovely terrible water damage. This is something that will rapidly decrease the worth of your RV and can also render it pointless. Taking treatment of your RV roofing is something you can probably do all on your own.
After concerning 10 years, it will certainly additionally be necessary to reseal the entire roofing system. To do this, you'll require to climb onto the roofing, however be extremely careful when you do.
Replace Rv Roof Eastvale, CA
Next, you'll want to clean your roof covering extensively, so as to remove any kind of dust bits. You can make use of a lengthy managed brush for this, however never utilize a cleaner which contains petroleum solvents or citrus components on your rubber or plastic roofing system. These kinds of cleaners will certainly create irreversible damages to the surface area.
While you're cleaning up, remove any kind of debris or old roof covering material, however beware while you do this as you can easily elongate a tear, and even punch an opening through the roof. You ought to then dry out the roofing system as best as you can. Keep In Mind: Rubber recreational vehicle roofing systems can be really slippery when wet.
After the roof is clean, you are mosting likely to want to evaluate the seams for openings, splits or peeling off, so you can reseal any place needed. You'll desire to make a factor of resealing all joints when a year whether or not they reveal indications of wear.
Rubber Roofing For Rv Eastvale, CA

When it comes to picking the ideal Motor home roof covering sealant, you'll want to consider whether you are fixing a tear, resealing a joint, or securing the whole roofing. It can be made use of for spot securing or to reseal every seam on the Motor home roof covering. Simply cleanse the area well and use with a caulk weapon.
Replace Rv Roof Eastvale, CA
Comparable to the EPDM system detailed above, this coating product will certainly cover your TPO roof and help it last another 10 years. Prior To EPDM and TPO, steel was the material of choice for Recreational vehicle roofings.
The abovementioned EternaBond is still king when it involves repairing little problems on a metal roof covering. It likewise works well for securing joints. Recreational vehicle steel roofings do require to be entirely resealed periodically. House roof layers will seal a metal roofing system simply great, however the best product without a doubt, for steel roof coverings, is Dicor Steel Motor Home Roofing System Covering.
See to it to reseal whenever required and challenge resealing all of the joints once every twelve month or two. Dicor Self-Leveling Lap Sealer functions well for this task. If your fiberglass roofing system needs to be coated, Dicor Fiberglass Roof Covering Finishing is a good choice. You'll need to eliminate the current roof.
Remove the vent fans, skylights, and a/c system. Peel the existing layer of rubber back up until you see the plywood structure beneath. Examine plywood for rot, bowing, mold, or splintering. Replace damaged items. Once the plywood prepares, it's ideal to clean up the plywood with something like mineral spirits to eliminate any kind of kind of particles.
Rv Rubber Roof Repair Eastvale, CA
Do this in little pieces all along the roofing system, cutting holes in the rubber roofing for any kind of attribute that will certainly go back into the roofing. Replace your roof's fans, skylights, and Air conditioner unit.
In this article, we desire to share with you exactly how to DIY RV roof repair. Understanding just how to DIY a whole lot of the points that can break or mess up will conserve you not only a great deal of money on RV fixings yet can additionally save you a lot of prospective time in the shop!
Repair Rv Roof Leak Eastvale, CA
I may receive a tiny payment when you make an acquisition using my link. Often, however, we find ourselves in unexpected situations. This is how we finished up with a few small rips on the roof covering of our RV.
We assumed we were clear of the branches, however we wound up capturing a few of them on the much left side of the roof. There were an overall of 4-5 tiny openings in the side of the roof. We didn't inspect the roofing system because we didn't believe we hit anything.
One of the tears in our RV roofing system A couple of weeks later, we endured an extreme thunderstorm and a great deal of rainfall. Throughout the storm, we discovered that we had a little quantity of water leaking with among the lights in the bathroom. Thankfully, we did not wind up with any irreversible water damage.
Rv Fiberglass Roof Repair Eastvale, CA
He covered it as ideal he can with durable gorilla tape and after that purchased the materials required to do a motor home roof covering repair service. The EPDM rubber roof product that the majority of RVs include is typically pretty challenging as for roofing materials go. Rubber roofing systems last for many years, yet they do tear if captured hard enough.
In our case, this implied getting rid of the gorilla tape that we had actually used as a short-term solution while we waited on the products we got to arrive. You'll desire to clean up the location around the tear that you will certainly be covering well. This permits the spot to appropriately stick and will prevent future leaks.
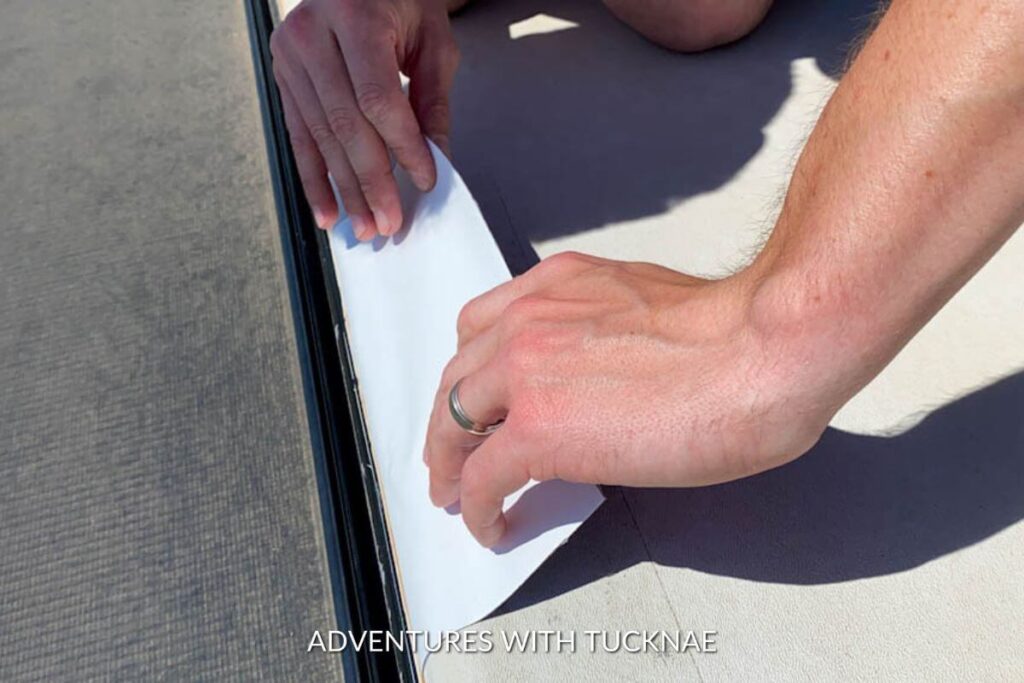
To cleanse the roof covering, make use of massaging alcohol and either a cloth or paper towels., which is a Recreational vehicle roof covering repair tape.
You will wish to ration just how much you require and reduce an item as necessary. Remove the support and use carefully over the tear in the roofing. Once it has touched the roof, it adheres rather rapidly, so you'll wish to ensure and setting it right the initial time.
Rv Rubber Roof Repair Eastvale, CA
Press strongly and proceed to massage it and ravel the spot for several mins. Using a caulk weapon, layer the entire patch with Dicor 501LSW-1 Epdm Self-Leveling Lap Sealant. This rubber sealer creates a safe additional seal on your rubber roof and makes certain that the leak is appropriately secured.
There are a whole lot of Dicor RV roof covering repair work products that you can get including roofing coatings, roofing system sealant, and extra for the surface of your roof. Using the Dicor lap sealer Begin on the edges and work your way around the whole spot, filling up in the middle as you go.
Clean any kind of excess off and don't enable it to run down too much. This is a self-leveling sealant so you must finish up with a relatively level patch (Eastvale Rv Trailer Rubber Roof Repair). According to the producer, it will be water-proof in 4 hours, 80% treated in 2 days, and 100% cured in 1 month
Rubber Roof For Rv Eastvale, CA
To change a whole Recreational vehicle roofing with significant damages would result in much even more costly repair services. To prevent Motor home roofing issues, inspecting your roofing consistently during Recreational vehicle maintenance is an excellent idea.
Your motor home is a home on wheels, whether for several days each time or all year round. Like a home, the water systems can leakage, such as the fresh water container or the water heater. A RV is additionally extra susceptible to certain leakages, such as in the roofing, since it is mobile and has an extra lightweight style than your home.
The very best technique for lowering expenses is recognizing typical leakages early and giving a reliable solution. Your recreational vehicle is a considerable investment. Evaluations and fixings keep it in great condition so you can enjoy much more journeys when driving. Right here are a couple of factors assessments and repair work matter: When you inspect your recreational vehicle consistently, you can catch issues like leaks prior to they trigger substantial damage to your inside.
Rv Trailer Roof Repair Eastvale, CA
Water leaking from the cooling device outside the recreational vehicle is typical throughout operation. The water must follow a certain path down the channels on the roof that lead it to either the forward or aft edge of the rig. If you see water leaking inside or leaking in an additional location outside, that could represent a concern with the system.
Pipes leaks can show up in the storage area. Sometimes, water damage presents evident indications, however you might not observe it quickly in other situations.
They may additionally reduce resale worth. Before you begin the process of camper leak fixing, you require to locate the source. Comply with these steps to recognize the leakage's origin point: Inspect the roof covering, wall surfaces, ceilings and doors to locate any type of areas with worn or broken seals and caulking. Check the walls and floors for any soft places.
Consider any kind of noticeable plumbing pipes and installations for deterioration, trickling or damp places. Run water through the faucets and look for leaking water at the links. Check out wastewater and freshwater systems for fractures or leaks in the tanks, links and pipes. Scent for musty odors to find where they come from.
Rv Roof Repair Service Near Me Eastvale, CA
OCRV Center
Address: 23281 La Palma Ave Yorba Linda, CA 92887Phone: (714) 909-1444
Email: [email protected]
OCRV Center
Spray particular areas while somebody else stands inside the camper to see where water obtains in. A flashlight illuminates the room for extra efficient inspection in cramped, dark locations like closets and pipes components. This tool connects to tubes to check for unusual pressure drops that may suggest a leakage.
Rv Refrigerator Repair Near Me Eastvale, CAMotorhome Repair Shop Eastvale, CA
Rv Floor Repair Near Me Eastvale, CA
Rv Mechanics Near Me Eastvale, CA
Rv Repair In My Area Eastvale, CA
Rv Repair In My Area Eastvale, CA
Rv Solar Installation Eastvale, CA
Rv Refrigerator Repair Near Me Eastvale, CA
Rv Repairs Near Me Eastvale, CA
Rv Mechanics Near Me Eastvale, CA
Rv Repair Centers Near Me Eastvale, CA
Rv Repair In My Area Eastvale, CA
Motorhome Repair Service Eastvale, CA
Motorhome Awning Repair Eastvale, CA
Motorhome Refrigerator Repair Eastvale, CA
Rv Repair Places Near Me Eastvale, CA
Rv Repairs Near Me Eastvale, CA
Rv Mechanics Near Me Eastvale, CA
Rv Repair Shops Near My Location Eastvale, CA
Rv Repair Places Near Me Eastvale, CA
Motorhome Awning Repair Eastvale, CA
Rv Service And Repair Near Me Eastvale, CA
Rv Mechanics Near Me Eastvale, CA
Rv Mechanics Near Me Eastvale, CA
Best Rv Repair Near Me Eastvale, CA
Rv Solar Installation Eastvale, CA
Rv Floor Repair Near Me Eastvale, CA
Rv Service And Repair Near Me Eastvale, CA
Rv Repair In My Area Eastvale, CA
Rv Refrigerator Repair Near Me Eastvale, CA
Motorhome Repair Service Eastvale, CA
Rv Repair Shops Near My Location Eastvale, CA
Motorhome Generator Repair Near Me Eastvale, CA
Rv Repair Shops Near My Location Eastvale, CA
Rv Repair Places Near Me Eastvale, CA
Motorhome Refrigerator Repair Eastvale, CA
Rv Plumbing Repair Near Me Eastvale, CA
Rv Repair Centers Near Me Eastvale, CA
Rv Repairs Near Me Eastvale, CA
Motorhome Refrigerator Repair Eastvale, CA
Rv Mechanics Near Me Eastvale, CA
Motorhome Repair Shop Eastvale, CA
Motorhome Service And Repair Near Me Eastvale, CA
Rv Solar Panel Installation Eastvale, CA
Rv Solar Installation Eastvale, CA
Motorhome Repair Service Eastvale, CA
Motorhome Awning Repair Eastvale, CA
Rv Delamination Repair Near Me Eastvale, CA
Rv Solar Panel Installation Eastvale, CA
Rv Floor Repair Near Me Eastvale, CA
Rv Repair Shops Near My Location Eastvale, CA
Rv Repair And Service Near Me Eastvale, CA
Rv Repair Service Near Me Eastvale, CA
Rv Repairs Near Me Eastvale, CA
Rv Solar Panel Installation Eastvale, CA
Rv Plumbing Repair Near Me Eastvale, CA
Rv Service Repair Near Me Eastvale, CA
Rv Repair And Service Near Me Eastvale, CA
Rv Ceiling Repair Eastvale, CA
Motorhome Repair Service Eastvale, CA
Rv Delamination Repair Near Me Eastvale, CA
Motorhome Repair Near Me Eastvale, CA
Rv Repair Places Near Me Eastvale, CA
Rv Repair Centers Near Me Eastvale, CA
Rv Repairs Near Me Eastvale, CA
Motorhome Generator Repair Near Me Eastvale, CA
Motorhome Service And Repair Near Me Eastvale, CA
Motorhome Service And Repair Near Me Eastvale, CA
Camper Ac Repair Near Me Eastvale, CA
Rv Repair Services Near Me Eastvale, CA
Motorhome Repair Shops Eastvale, CA
Rv Floor Repair Near Me Eastvale, CA
Motorhome Refrigerator Repair Eastvale, CA
Motorhome Refrigerator Repair Eastvale, CA
Motorhome Generator Repair Near Me Eastvale, CA
Motorhome Repair Shop Eastvale, CA
Rv Service And Repair Near Me Eastvale, CA
Rv Ceiling Repair Eastvale, CA
Near My Location Seo Pricing Eastvale, CA
In My Area Seo Near Me Eastvale, CA
OCRV Center
Table of Contents
- – Rv Roof Repair Near Me Eastvale, CA
- – OCRV Center
- – Rv Rubber Roof Maintenance Eastvale, CA
- – Rv Trailer Rubber Roof Repair Eastvale, CA
- – Motorhome Roof Replacement Eastvale, CA
- – Replace Rv Roof Eastvale, CA
- – Rubber Roofing For Rv Eastvale, CA
- – Replace Rv Roof Eastvale, CA
- – Rv Rubber Roof Repair Eastvale, CA
- – Repair Rv Roof Leak Eastvale, CA
- – Rv Fiberglass Roof Repair Eastvale, CA
- – Rv Rubber Roof Repair Eastvale, CA
- – Rubber Roof For Rv Eastvale, CA
- – Rv Trailer Roof Repair Eastvale, CA
- – Rv Roof Repair Service Near Me Eastvale, CA
- – OCRV Center
Latest Posts
Rv Trailer Rubber Roof Repair West Covina
Awning Installation Norco
Rv Awning Repair Placentia
More
Latest Posts
Rv Trailer Rubber Roof Repair West Covina
Awning Installation Norco
Rv Awning Repair Placentia