All Categories
Featured
Table of Contents
- – Rubber Roof Installation Irvine, CA
- – OCRV Center
- – Rv Slide Out Roof Repair Irvine, CA
- – Rubber Roofing For Campers Irvine, CA
- – Rubber Roof For Rv Irvine, CA
- – Rv Roof Repair Near Me Irvine, CA
- – Rv Rubber Roof Replacement Irvine, CA
- – Rv Trailer Rubber Roof Repair Irvine, CA
- – Rv Roof Leak Repair Irvine, CA
- – Replace Rv Roof Irvine, CA
- – Rv Roof Maintenance Irvine, CA
- – Rv Roof Repair Service Near Me Irvine, CA
- – Rubber Roof For Rv Irvine, CA
- – Epdm Rv Roof Repair Irvine, CA
- – OCRV Center
Rubber Roof Installation Irvine, CA
After finishing the job, Steve and I did a final stroll around. We inspected the seals around every window, door, trim and vent to verify that I didn't miss anything. Steve has a ranking system that he utilizes on our YouTube network (go examine it out, if you have not yet).

Apply brand-new sealant. And now you're protected versus water damage for one more year!
Extended exposure to rainfall, extreme warmth, icy temperatures, rough cleansing detergents, tree branches, and also oxidation can trigger roof covering seals to wear away, causing water damages. If you're questioning exactly how to correctly seal a RV roof, this blog post will certainly walk you with the needed steps. Use our tips to make sure the sealer application process offers long-lasting security for several years ahead.
Rv Slide Out Roof Repair Irvine, CA
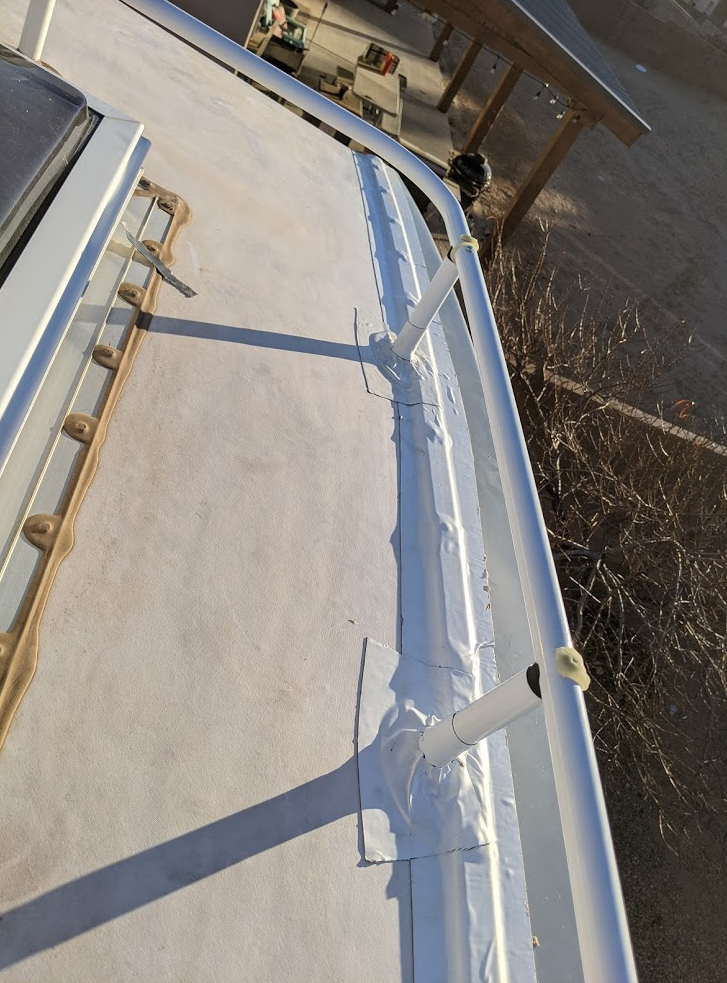
Where the front cap fulfills the roof covering. Edges and corners of the roofing system's perimeter. The area around the air conditioner unit(s) and skylight(s). The seals around fixtures, like the roofing system air vent, fridge air vent, satellite dishes, and antennas. Around any other accessories set up on the roofing. Make use of these steps to clean and reseal the roofing of your rv: Apply the sealer on a cozy, completely dry day, preferably with temperature levels between 70 and 80 levels Fahrenheit.
Begin your application early in the early morning to avoid working under the warm of the lunchtime sun. And also, it takes 3 to 4 hours to finish the task and a few even more to dry in the sunlight. Start by brushing up the roofing and, voids, and worn-out seals. Pay special attention to areas around roofing vents, skylights, edges, and sides.
Rubber Roofing For Campers Irvine, CA
Rubber handwear covers. Ladder. Plastic putty knife to get rid of old sealer. The cleaner the location, the much better the sealant's get in touch with and adhesion. Begin by brushing up the roof covering. Next, moisten a towel with unsmelling mineral spirit to clean the filthy sealer. Clean with a dry towel, focusing on nooks and sides. If your motor home roofing is super unclean, and the sealer is intact, give it a good cleaning using water, a soft bristle brush, and mild soap.
Yet if the sealer has badly harmed locations, stay clear of utilizing water as it can penetrate the cracks. If the sealant is still flexible, soft, and very easy to press, you can apply new sealer straight ahead. Nevertheless, if it is old, hard, cracked, bumpy, or irregular, removal is needed for a correct seal.
Instead, make use of a putty blade or scuffing blade to carefully raise it. For stubborn places, utilize a warm gun to soften it. Numerous RVers make the error of reducing a big opening on the end of the caulking tube, which can launch way too much product. Instead, produce a little opening at a minor angle (around 22 levels) to manage the circulation and prevent too much stress throughout application.
Rubber Roof For Rv Irvine, CA
Pause until you are ready to apply. Holding the caulking weapon at a 45-degree angle, slowly run the nozzle along the outer side and after that the inner edges of the old sealant. Fill up the location between both lines of sealer with a modest amount of sealer, while guaranteeing it is evenly dispersed.
Usage Dicor non-sag sealer on the brink, and Dicor self-leveling lap sealer on flat locations. The bright side is that Dicor lap sealers service any roofing system kind. Don't tackle a big area at when. Apply sealer in workable areas, regarding one to 2 feet at once to stop the sealant from creating a skim layer on the top.
Keep in mind to clean the end of your caulking gun before starting a new section to avoid any kind of buildup that could affect the sealant's performance. The drying out time can differ based upon the sealer kind and environmental conditions. Typically, this can take 24 to two days. Do not subject the sealer to any dampness prior to it dries out.
It's a super-sticky, waterproof tape that can last anywhere from 5 to 15 years and features a 15-year warranty. Here's just how to use EternaBond. The primary step is to cleanse the existing sealant and locations around it utilizing mineral spirits or water. If the existing sealer is old and broken, remove it and use EternaBond, and then apply new lap sealant around the sides of the EternaBond tape.
Rv Roof Repair Near Me Irvine, CA
Cut the length you require for the area you're using, lay it down on the roof covering, and gradually peel off the support off. Push down the tape with a little roller as you go to turn on the adhesive for a limited seal. Make sure there are no creases. For more tranquility of mind, apply a little grain of lap sealer along the edge of EternaBond tape.
EternaBond is very simple to fix. Simply patch a new strip over the harmed section (Rv Trailer Roof Repair Irvine). Right here are some frequently asked questions regarding the RV roofing securing process. You need to reseal your motorhome or trailer roof covering every 2 years, relying on your area's environment and roof material. Normal inspections in the springtime can help determine if resealing is required faster.
Rv Rubber Roof Replacement Irvine, CA
As soon as the surface is clean from particles, you can wipe down the area with Acrysol body de-greaser or mineral spirits to clean the surface. Acrysol will remove any of the old dirt and oils from the roofing and sealant surface area. If there is anything loose, you will need to eliminate it before securing.
When everything is protected appropriately, then you prepare to start the resealing procedure. As soon as you have the sealants cleansed to your desired level, you can after that begin the securing procedure. Make certain that anything loosened gets scuffed off Right here is a link for Acrysol Scrape tool blue CRL stick Conical idea stick and take care of The very best caulking gun Dicor self-leveling lap sealant Ensure you look into Dustin's website, California Recreational Vehicle Professionals, and their YouTube network for even more helpful details, and see our released posts on and other social media sites web pages. Thanks, Dustin.
Rv Trailer Rubber Roof Repair Irvine, CA
The very first step is choosing the best sealant, which relies on the material of your recreational vehicle roof covering. A lot of modern Motor homes have actually roofs made from rubber, as this product is particularly long lasting, yet older automobiles frequently have metal or fiberglass roofings. When choosing a sealer, the initial point you need to do is make sure that it works with the product of your recreational vehicle roofing system.
The actions for these can differ based upon your roof covering type, so it's vital to understand the product yours is made of. Once you know that, you can discover to do an RV roof repair work. If your rubber roof covering is flaking or looks milky, it possibly needs a brand-new layer of sealant.
Rv Roof Leak Repair Irvine, CA
Don't make use of a foam roller. Let the sealant completely dry for 24 hours before traveling however understand it's waterproof in as low as three hours. A fiberglass roofing system can be resealed with recreational vehicle Roofing system Magic, similar to a rubber roof. The primary distinction is the preparation of the surface area. Prior to you clean the roofing system, scuff any kind of loosened, curled pieces of fiberglass layer off.
Clean and wash the roofing and allow it to completely dry entirely. Use the RV Roofing Magic to the whole roof with a roller. Motor home Roof Magic can also be used to aluminum and various other metal roof coverings. It is mildew-resistant and will form a rubber-like layer on top of the roofing to offer corrosion protection.
An additional fundamental part of RV roofing system repair service is resealing joints. Fortunately, the steps for this are basically the very same for all roofing materials when you use Butyl MS Caulk for the resealing. First, clean the surface area of any kind of debris to make certain correct adhesion. This includes dirt, frost, oil, oils, and corrosion.
The caulk will certainly be treated in 1 day and be totally cured in seven to 14 days. If you find an opening or tear in your motor home roofing, you'll need to repair it with Poly Material, Joint Tight, and Joint Tape, depending upon the type of tear. Joint tape can be used by aligning both adjacent locations that need to be secured and putting the tape on them.
Replace Rv Roof Irvine, CA
You can place it onto damp Seam Tight, which will stick and turn into one with the item. You can use Recreational vehicle Roof Magic over that location and the rest of the roofing to ensure the joint never comes apart again. Recreational vehicle roofing repair work can be daunting if you don't know where to start.
It is a very easy and cost-effective job for any kind of Do-It-Yourself RV owner. Below's what you require to understand. Inspect the seals and examine for water damages before buying any recreational vehicle, even brand-new ones. If you discover poor seals, it could signal a possible water intrusion issue. Once you are certain that the recreational vehicle is properly secured, after that I would certainly recommend rechecking them at the very least yearly.
This window seal will allow water enter Pay special interest to joints on the leading and sides. They are extra at risk to wear and leak because they obtain the majority of water overflow from the roof.:. Rusty screws that protect wall surface panels, lights, and other openings are an indication that wetness is behind the outer wall.
Pay additional interest to those areas. If your not certain where those are, look for spotting along the sides. One areas usually missed out on is next to the awning. Right here's a Moving within, water damages around windows can cause swelling, discoloration or potentially mold and mildew in the bordering wall paneling. Perform an aesthetic examination after that push the surface area around the window checking for softness.
Rv Roof Maintenance Irvine, CA
Water dripping from the top of a home window often runs down the side of the home window into the paneling around the lower corners. As soon as you've recognized what areas require to be resealed, follow these steps to get a specialist result. Utilize the pointy and level end of a scrape to remove all existing sealer.
Mineral spirits can assist loosen up residual sealant after the very first scrape. Pour some on a rag wipe the around the area offering it a few mins to do its magic before proceeding. Make use of a scraper to eliminate old sealant If you're fretted about scratching your paint task, then I 'd recommend utilizing a plastic scraper.
Rv Roof Repair Service Near Me Irvine, CA
An energy knife works well for this. This step is crucial to getting an appropriate seal. Spray on some window cleaner and use a tidy cloth or store towel to clean the area. The home window cleaner will clean it up nicely and evaporate quicker. Clean surface effectively before applying brand-new sealant Dry the whole area with a towel prior to relocating on.
Tape around window frame leaving 1/8 boundary for sealer What kind of sealant to use? Everybody has their favorite sealer for each type of surface and application.
I prefer the clear 100% silicone sealer from my neighborhood shop since it works fantastic and can be found in a capture tube. I choose a clear silicon in a press tube because it's less complicated to apply in small locations functions great too and is a little bit a lot more costly. I do keep a number of tubes of ProFlex helpful however mainly utilize it in other locations.
Rubber Roof For Rv Irvine, CA
This home window seal will let water obtain in Pay special focus to seams on the top and sides. They are more vulnerable to put on and leak since they obtain the majority of water overflow from the roof.:. Rusty screws that safeguard wall surface panels, lights, and other openings are a sign that dampness is behind the outer wall.
Pay added attention to those places. If your unsure where those are, try to find streaking along the sides. One locations often missed is beside the awning. Below's a Moving inside, water damages around home windows can cause swelling, discoloration or possibly mold and mildew in the bordering wall surface paneling. Execute an aesthetic examination after that press the surface area around the window checking for gentleness.
Water leaking from the top of a window frequently diminishes the side of the window into the paneling around the lower corners. Once you've determined what locations need to be resealed, comply with these steps to get an expert outcome. Utilize the pointy and flat end of a scrape to eliminate all existing sealer.
Epdm Rv Roof Repair Irvine, CA
Mineral spirits can aid chill out recurring sealer after the very first scrape. Pour some on a rag wipe the around the location offering it a couple of minutes to do its magic prior to proceeding. Use a scrape to get rid of old sealer If you're fretted about scraping your paint task, then I would certainly recommend utilizing a plastic scrape.
Spray on some home window cleaner and utilize a tidy cloth or store towel to clean the area. Clean surface very well prior to applying new sealer Dry the entire area with a towel prior to relocating on.
Tape around window structure leaving 1/8 border for sealer What kind of sealant to use? Everybody has their favorite sealer for each type of surface area and application.
OCRV Center
Address: 23281 La Palma Ave Yorba Linda, CA 92887Phone: (714) 909-1444
Email: [email protected]
OCRV Center
I prefer the clear 100% silicone sealer from my neighborhood shop due to the fact that it works great and comes in a press tube. I favor a clear silicon in a capture tube because it's easier to use in little locations works great also and is a bit a lot more costly. I do keep a number of tubes of ProFlex useful yet largely use it in other locations.
Motorhome Roof Replacement Irvine, CARv Rubber Roof Repair Irvine, CA
Rubber Roof Installation Irvine, CA
Rubber Roof Installation Irvine, CA
Rv Roof Repair Service Near Me Irvine, CA
Rubber Roofing For Campers Irvine, CA
Repair Rv Roof Irvine, CA
Rubber Roof For Rv Irvine, CA
Epdm Rv Roof Repair Irvine, CA
Rv Roof Leak Repair Irvine, CA
Rv Roof Leak Repair Near Me Irvine, CA
Rv Roof Replacement Irvine, CA
Rv Fiberglass Roof Repair Irvine, CA
Rv Roof Replacement Irvine, CA
Rubber Roofing For Campers Irvine, CA
Rv Roof Repair Fiberglass Irvine, CA
Rv Trailer Rubber Roof Repair Irvine, CA
Replace Rv Roof Irvine, CA
Rv Rubber Roof Maintenance Irvine, CA
Rubber Roofing For Campers Irvine, CA
Rv Rubber Roof Replacement Irvine, CA
Rv Roof Repair Service Near Me Irvine, CA
Resealing Rv Roof Irvine, CA
Rubber Roof For Rv Irvine, CA
Rv Slide Out Roof Repair Irvine, CA
Rv Roof Leak Repair Near Me Irvine, CA
Rv Trailer Rubber Roof Repair Irvine, CA
Class C Rv Roof Repair Irvine, CA
Rubber Roof For Rv Irvine, CA
Motorhome Roof Replacement Irvine, CA
Rv Trailer Rubber Roof Repair Irvine, CA
Rubber Roofing For Campers Irvine, CA
Rv Rubber Roof Repair Irvine, CA
Rubber Roof Installation Irvine, CA
Repair Rv Roof Irvine, CA
Motorhome Roof Replacement Irvine, CA
Rv Roof Repair Irvine, CA
Rubber Roof Installation Irvine, CA
Roof Repair For Rv Irvine, CA
Rubber Roofing For Rv Irvine, CA
Class C Rv Roof Repair Irvine, CA
Rv Roof Leak Repair Irvine, CA
Roof Repair For Rv Irvine, CA
Rubber Roofing For Rv Irvine, CA
Repair Rv Roof Leak Irvine, CA
Repair Rv Roof Leak Irvine, CA
Motorhome Roof Replacement Irvine, CA
Rv Roof Replacement Irvine, CA
Epdm Rv Roof Repair Irvine, CA
Rv Rubber Roof Replacement Irvine, CA
Repair Rv Roof Leak Irvine, CA
Resealing Rv Roof Irvine, CA
Rv Roof Maintenance Irvine, CA
Rubber Roof For Camper Irvine, CA
Rubber Roof For Rv Irvine, CA
Epdm Rv Roof Repair Irvine, CA
Rv Trailer Roof Repair Irvine, CA
Rv Trailer Rubber Roof Repair Irvine, CA
Rubber Roof For Camper Irvine, CA
Rv Slide Out Roof Repair Irvine, CA
Rubber Roofing For Campers Irvine, CA
Rv Rubber Roof Maintenance Irvine, CA
Epdm Rv Roof Repair Irvine, CA
Rv Roof Replacement Irvine, CA
Repair Rv Roof Irvine, CA
Rv Roof Leak Repair Irvine, CA
Rv Roof Repair Irvine, CA
Repair Rv Roof Leak Irvine, CA
Repair Rv Roof Leak Irvine, CA
Rv Roof Leak Repair Irvine, CA
Rv Roof Maintenance Irvine, CA
Rv Roof Replacement Irvine, CA
Rv Trailer Rubber Roof Repair Irvine, CA
Epdm Rv Roof Repair Irvine, CA
Rv Roof Leak Repair Near Me Irvine, CA
Rv Slide Out Roof Repair Irvine, CA
Rv Rubber Roof Maintenance Irvine, CA
Rv Rubber Roof Repair Irvine, CA
Near Seo Companies Near Me Irvine, CA
Finding A Local Seo Marketing Irvine, CA
Rv Trailer Roof Repair Irvine, CA
OCRV Center
Table of Contents
- – Rubber Roof Installation Irvine, CA
- – OCRV Center
- – Rv Slide Out Roof Repair Irvine, CA
- – Rubber Roofing For Campers Irvine, CA
- – Rubber Roof For Rv Irvine, CA
- – Rv Roof Repair Near Me Irvine, CA
- – Rv Rubber Roof Replacement Irvine, CA
- – Rv Trailer Rubber Roof Repair Irvine, CA
- – Rv Roof Leak Repair Irvine, CA
- – Replace Rv Roof Irvine, CA
- – Rv Roof Maintenance Irvine, CA
- – Rv Roof Repair Service Near Me Irvine, CA
- – Rubber Roof For Rv Irvine, CA
- – Epdm Rv Roof Repair Irvine, CA
- – OCRV Center
Latest Posts
Employee Benefits Consulting Firms Aliso Viejo
Villa Park Employee Benefits Solutions
Burbank Kitchen Hood Repair Service
More
Latest Posts
Employee Benefits Consulting Firms Aliso Viejo
Villa Park Employee Benefits Solutions
Burbank Kitchen Hood Repair Service