All Categories
Featured
Table of Contents
- – Rv Roof Repair Fiberglass Riverside, CA
- – OCRV Center
- – Rv Slide Out Roof Repair Riverside, CA
- – Best Rv Roof Repair Riverside, CA
- – Rv Rubber Roof Replacement Riverside, CA
- – Rv Rubber Roof Maintenance Riverside, CA
- – Rv Trailer Roof Repair Riverside, CA
- – Best Rv Roof Repair Riverside, CA
- – Replace Rv Roof Riverside, CA
- – Replace Rv Roof Riverside, CA
- – Rubber Roof For Rv Riverside, CA
- – Resealing Rv Roof Riverside, CA
- – Rubber Roof Installation Riverside, CA
- – Rubber Roof Installation Riverside, CA
- – OCRV Center
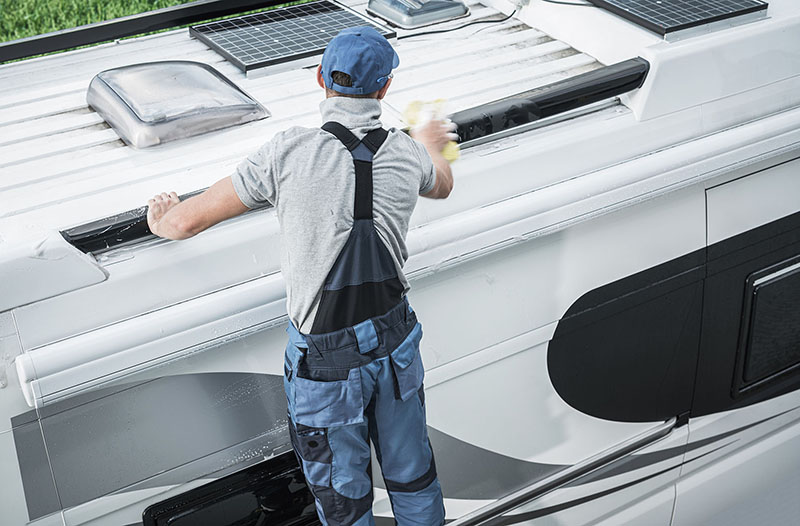
Rv Roof Repair Fiberglass Riverside, CA
Roof demolition, of program. Once completed, we can get to function on the Motor home roofing repair service.
We reduced away any kind of timber that has been damaged. Once the damaged portions have been removed we're prepared to change those areas with brand-new timber. This recreational vehicle roofing system fixing addresses both an old roofing as well as underlying damages influencing the stability of the motor home. When the framework below is audio, we start the process of securing it back up and changing that old rubber roofing system.
We likewise require to place back all of the vents we eliminated, ensuring the seals are good and tight to avoid more damages. Figuring out the correct sealer is important. There is more than one sort of product being used and sealers are details. Remember, one little crack in a seal is all it takes to enable water in to harm that stunning brand-new roofing throughout once more.
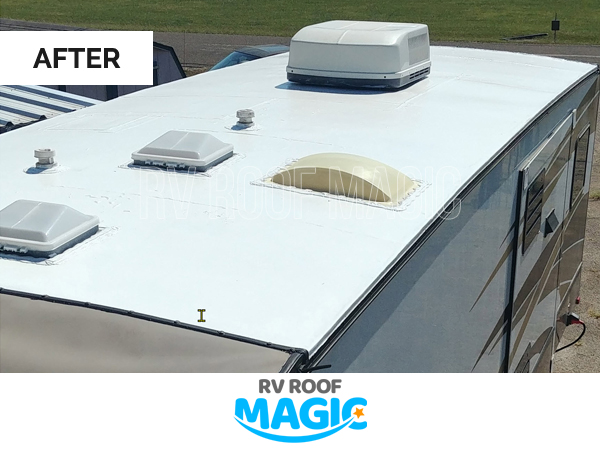
The brand-new roof covering is water-tight, looks wonderful, and is a fantastic upgrade from the initial, weakening rubber roof covering. This sort of practical recreational vehicle upgrade you make into wonderful brand-new recreational vehicle interior features. Since you have actually seen the fundamentals of recreational vehicle roofing system repair service and motor home rubber roofing substitute, you might be attracted to try it on your very own.
Rv Slide Out Roof Repair Riverside, CA
But we understand that several of you love to service your Recreational vehicles and attempt your own motor home fixings. Riverside Rubber Roof For Camper. If you have actually got a dripping roof covering or an old rubber roofing that requires replacement and you need some recommendations, bring it down and we can chat you with the steps. Much better still, bring it in and let us have a look at it before you begin any work
When it comes to RV roofing system substitute, there are a number of variables to consider. In time, your recreational vehicle's roofing system can become used, harmed, or create leaks, which can compromise its integrity and cause more substantial concerns. If you're experiencing any of these problems, it may be time to think about changing your recreational vehicle roofing system.
There are a number of indicators that show your motor home calls for a roofing substitute. These indicators consist of water leaks, sagging or soft spots on the roofing system, splits or splits in the roofing material, too much damage, and noticeable sunshine coming with the roofing system. If you discover any one of these signs, it is vital to resolve them without delay to avoid more damage to your recreational vehicle.
Typically, motor home roof covering substitute costs can range from $2,000 to $10,000. It is essential to take into consideration the long-term benefits and prospective cost savings that feature investing in a high-grade roofing substitute. When picking a motor home roof covering product, a number of factors enter play. These consist of durability, weight, insulation buildings, upkeep needs, and cost.
Best Rv Roof Repair Riverside, CA
Deciding in between a do-it-yourself (DO IT YOURSELF) technique or professional installment for your motor home roof covering replacement relies on your skills, experience, and offered time. While DIY installment can save you cash, it calls for adequate understanding and proficiency to ensure a correct and watertight setup. On the other hand, specialist setup gives the advantage of proficiency, experience, and warranties.
Inspect and clean the rain gutters and downspouts to make sure appropriate drainage and protect against water merging on the roofing system. Apply a safety coating or sealer to the roofing surface area as advised by the maker. This can supply extra UV protection and aid prolong the life of the roof covering. Avoid walking on the roof unless essential.
The expense of installing a Motor home roof can differ based on variables like Recreational vehicle size, selected roof material, and whether expert installation is asked for. If your Recreational vehicle's roof covering is harmed, used out, or leaking, a roof covering substitute is commonly required to make sure the architectural honesty of your Motor home.
Fixing a rip in a RV roofing depends upon the severity and sort of roof material. For minor rips, you can make use of roofing system repair tape or sealant especially made for recreational vehicle roof coverings. Larger holes might require patching with a suitable roofing material or seeking specialist aid. Motor home roof finishes can provide extra defense and extend the life-span of your roof covering.
Rv Rubber Roof Replacement Riverside, CA
Spending in a high-grade motor home roofing covering can be worth it for long-lasting roof covering upkeep. Flex Seal products are often used as short-term or quick-fix services for tiny leakages or splits. While they may supply a temporary option, it's recommended to speak with a professional and utilize appropriate motor home roofing system repair work materials for a more irreversible and reliable solution.
PVC roofings provide exceptional resilience, resistance to UV rays, and low upkeep demands. They are taken into consideration a trusted choice for Motor home roofings, but the finest option depends on your certain needs and choices.
Resealing your motor home roof should be done on a regular basis to keep its stability and prevent leaks. As a general guideline, it's advised to reseal your motor home roofing at the very least once a year or as per the supplier's referrals. Whether to leave your motor home slides in or out depends upon the scenario and individual preference.
Consider factors such as safety, weather, and ease when making the choice. RV roofing leakages are fairly typical due to numerous elements such as age, wear and tear, incorrect upkeep, or severe climate problems. Normal evaluations and proactive maintenance can assist lessen the occurrence of leaks. The choice to amount to a RV due to water damages relies on the extent of the damage and the insurer's evaluation.
Rv Rubber Roof Maintenance Riverside, CA
Insurance protection for recreational vehicle delamination relies on the certain plan and the reason for delamination. It is very important to examine your insurance coverage and consult with your carrier to understand the coverage for delamination and any suitable deductibles. Claiming water damages on a camper depends on your insurance policy and the scenarios bordering the water damage.
It's recommended to look for expert support for this sort of repair to ensure appropriate structural integrity and protect against future problems. Fiberglass RV roofs offer advantages such as longevity, lightweight building, and excellent insulation homes. They are less prone to cracking and can provide better security versus extreme weather contrasted to a few other roofing materials.
Tarping your recreational vehicle roof covering can offer short-lived protection against leaks or additional damages throughout prolonged periods of storage space or when your RV is not being used. Ensuring the tarpaulin is safely attached and appropriately supported is vital to stop water merging and roofing system damages. Yes, covering your motor home while staying in it is possible and can supply additional security versus the elements.
Select a cover that fits your recreational vehicle's dimension and offers sufficient air flow to avoid dampness buildup. Whether it's okay to stand on a motor home roof covering depends on the manufacturer's guidelines and the type of roofing material. Particular recreational vehicle roofings can handle restricted weight, while others might need extra support or preventative measures.
Rv Trailer Roof Repair Riverside, CA
Looking after your motor home roof covering is crucial for maintaining the general condition and longevity of your recreational vehicle. Regular inspections, timely repairs, and appropriate maintenance can help stop expensive damages and prolong the lifespan of your motor home roofing. In this short article, we discussed the indications that indicate the requirement for a motor home roof substitute, the usual sorts of motor home roofs offered, elements to think about when picking a roofing material, the ordinary cost of a RV roofing system replacement, and the advantages and disadvantages of DIY versus expert installment.
Older Motor home roofings have a tendency to end up being brittle, split and leak much more conveniently, leading to pricey fixings. You're going to likewise want to take into consideration the product utilized to construct your Recreational vehicle roofing system.
Best Rv Roof Repair Riverside, CA
When it comes to changing a RV roofing, there are several various kinds of roofing systems to pick from. The most typical kind of Motor home roof is a rubber roofing system.
An additional typical kind of roofing system is a metal roofing. Fiberglass roofs are likewise popular for Motor home roofings.
Replace Rv Roof Riverside, CA
They likewise set you back less than metal roof coverings. Fiberglass roofs are hefty and require special tools for installment. There are acrylic roofings.
When it comes to replacing a recreational vehicle roofing system, there are 2 choices: DIY or specialist installment. If you pick to do the work on your own, then you can conserve cash on labor expenses. Nevertheless, it is necessary to note that DIY installation is not for everyone. It requires a certain degree of ability and expertise, and it can also be time-consuming.
Replace Rv Roof Riverside, CA
Professional installment is likewise quicker than DIY installment, so you can return to enjoying your recreational vehicle faster. Nevertheless, professional setup can be more pricey than DIY installation. Not just will fixing your RV roof covering with the Liquid Rubber RV Roofing Finish System be more affordable, but it will additionally be much less labor extensive and is much less complicated to do.
Hello there People, We are in the midst of replacing the roof on our 2011 37' Carriage Cameo. Our company believe the damages was sustained by the installer of the AC systems, as it is a direct slit (vertically) with the EPDM, wood decking, etc. We have actually gotten an initial estimate from the shop of $12k for the roof covering replacement.
Rubber Roof For Rv Riverside, CA
The price quote is initial as they have actually supplied this quote without them seeing the rig at all. Does 12k sound right to you individuals? I was thinking $5-7k maybe, yet 12k? Wow - that simply seems like a lot of dough. Ideas? ThanksTom.
Thermoplastic Olefin (TPO) is an energy-efficient and UV-resistant material generally utilized in Motor home roofing systems. While less usual, some Recreational vehicles feature light weight aluminum roofing systems.
Resealing Rv Roof Riverside, CA
Expert labor costs are commonly consisted of in the above estimates. Selecting do it yourself installment might minimize labor costs, yet it calls for a certain ability degree and time dedication. DIYers need to recognize material prices and guarantee the application is done correctly. Now, allow's explore the cost-saving advantages of utilizing SEMCO Liquid Membrane Layer for RV roof repair work: The elegance of SEMCO Liquid Membrane layer hinges on its cost.

This removes the demand for different items based upon your recreational vehicle's roof product, streamlining the repair process. SEMCO Liquid Membrane layer adapts to the movement of the recreational vehicle throughout travel and modifications in temperature. This flexibility avoids fracturing, a typical problem with rigid roofing materials. The versatility makes certain a longer life expectancy and fewer maintenance prices.
When it comes to replacing a Recreational vehicle roof covering, there are two choices: DIY or professional installation. It is essential to note that Do it yourself installation is not for every person.
Expert setup is likewise much faster than Do it yourself installment, so you can obtain back to appreciating your Recreational vehicle faster. Specialist installation can be much more expensive than Do it yourself installment.
Rubber Roof Installation Riverside, CA
Hey there Individuals, We are in the middle of replacing the roof on our 2011 37' Carriage Cameo. We believe the damage was received by the installer of the air conditioning systems, as it is a direct puncture (vertically) via the EPDM, wood outdoor decking, and so on. We have received a preliminary price quote from the shop of $12k for the roof substitute.
The quote is preliminary as they have offered this quote without them seeing the rig at all. I was thinking $5-7k maybe, but 12k? Wow - that simply appears like a heap of dough.
Thermoplastic Olefin (TPO) is an energy-efficient and UV-resistant product commonly made use of in Recreational vehicle roof coverings. While much less common, some RVs feature aluminum roofs.
Rubber Roof Installation Riverside, CA
Choosing for Do it yourself setup might minimize labor expenditures, however it calls for a specific skill degree and time dedication. DIYers need to be mindful of material expenses and make certain the application is done correctly.
OCRV Center
Address: 23281 La Palma Ave Yorba Linda, CA 92887Phone: (714) 909-1444
Email: [email protected]
OCRV Center
This eliminates the need for different items based on your Recreational vehicle's roofing system material, streamlining the repair work process. SEMCO Fluid Membrane adapts to the activity of the Motor home throughout traveling and adjustments in temperature level.
Rv Roof Repair Riverside, CARubber Roof Installation Riverside, CA
Rv Rubber Roof Replacement Cost Riverside, CA
Replace Rv Roof Riverside, CA
Rv Roof Repair Service Near Me Riverside, CA
Rv Rubber Roof Maintenance Riverside, CA
Rv Rubber Roof Replacement Cost Riverside, CA
Rv Trailer Roof Repair Riverside, CA
Rv Rubber Roof Replacement Cost Riverside, CA
Rv Roof Repair Near Me Riverside, CA
Rubber Roofing For Campers Riverside, CA
Rubber Roof Installation Riverside, CA
Rv Roof Leak Repair Riverside, CA
Rubber Roof For Camper Riverside, CA
Rv Roof Repair Fiberglass Riverside, CA
Rubber Roof For Rv Riverside, CA
Repair Rv Roof Riverside, CA
Motorhome Roof Replacement Riverside, CA
Rubber Roof Installation Riverside, CA
Replace Rv Roof Riverside, CA
Rv Roof Replacement Riverside, CA
Rubber Roof For Rv Riverside, CA
Rv Trailer Rubber Roof Repair Riverside, CA
Rv Rubber Roof Replacement Cost Riverside, CA
Resealing Rv Roof Riverside, CA
Rv Roof Repair Riverside, CA
Best Rv Roof Repair Riverside, CA
Rubber Roof For Camper Riverside, CA
Replace Rv Roof Riverside, CA
Resealing Rv Roof Riverside, CA
Rv Roof Replacement Riverside, CA
Best Rv Roof Repair Riverside, CA
Best Rv Roof Repair Riverside, CA
Rv Rubber Roof Repair Riverside, CA
Rubber Roof Installation Riverside, CA
Rv Roof Repair Riverside, CA
Rubber Roofing For Campers Riverside, CA
Rv Roof Repair Riverside, CA
Rv Roof Leak Repair Near Me Riverside, CA
Rubber Roofing For Campers Riverside, CA
Rv Roof Maintenance Riverside, CA
Rv Roof Leak Repair Near Me Riverside, CA
Resealing Rv Roof Riverside, CA
Epdm Rv Roof Repair Riverside, CA
Rv Roof Leak Repair Riverside, CA
Rv Rubber Roof Repair Riverside, CA
Rv Trailer Rubber Roof Repair Riverside, CA
Rubber Roof Installation Riverside, CA
Repair Rv Roof Leak Riverside, CA
Rv Roof Repair Service Near Me Riverside, CA
Roof Repair For Rv Riverside, CA
Roof Repair For Rv Riverside, CA
Rv Roof Repair Fiberglass Riverside, CA
Epdm Rv Roof Repair Riverside, CA
Replace Rv Roof Riverside, CA
Repair Rv Roof Riverside, CA
Rv Roof Maintenance Riverside, CA
Rv Rubber Roof Repair Riverside, CA
Rv Rubber Roof Repair Riverside, CA
Rv Roof Repair Fiberglass Riverside, CA
Rv Trailer Roof Repair Riverside, CA
Rubber Roof For Camper Riverside, CA
Rv Trailer Rubber Roof Repair Riverside, CA
Rv Roof Repair Fiberglass Riverside, CA
Repair Rv Roof Leak Riverside, CA
Roof Repair For Rv Riverside, CA
Rv Rubber Roof Repair Riverside, CA
Resealing Rv Roof Riverside, CA
Rv Roof Leak Repair Riverside, CA
Replace Rv Roof Riverside, CA
Replace Rv Roof Riverside, CA
Repair Rv Roof Leak Riverside, CA
Rubber Roof For Rv Riverside, CA
Rv Roof Repair Fiberglass Riverside, CA
Rubber Roofing For Rv Riverside, CA
Resealing Rv Roof Riverside, CA
Rubber Roof Installation Riverside, CA
Repair Rv Roof Riverside, CA
Local Seo Services For Small Business Riverside, CA
Find A Good Local Seo Optimization Services Riverside, CA
OCRV Center
Table of Contents
- – Rv Roof Repair Fiberglass Riverside, CA
- – OCRV Center
- – Rv Slide Out Roof Repair Riverside, CA
- – Best Rv Roof Repair Riverside, CA
- – Rv Rubber Roof Replacement Riverside, CA
- – Rv Rubber Roof Maintenance Riverside, CA
- – Rv Trailer Roof Repair Riverside, CA
- – Best Rv Roof Repair Riverside, CA
- – Replace Rv Roof Riverside, CA
- – Replace Rv Roof Riverside, CA
- – Rubber Roof For Rv Riverside, CA
- – Resealing Rv Roof Riverside, CA
- – Rubber Roof Installation Riverside, CA
- – Rubber Roof Installation Riverside, CA
- – OCRV Center
Latest Posts
City Of Industry Home Hvac Maintenance
La Canada Flintridge Heat Pump Repair
Ductless Heating And Cooling La Crescenta
More
Latest Posts
City Of Industry Home Hvac Maintenance
La Canada Flintridge Heat Pump Repair
Ductless Heating And Cooling La Crescenta