All Categories
Featured
Table of Contents
- – Replace Rv Roof West Covina, CA
- – OCRV Center
- – Resealing Rv Roof West Covina, CA
- – Rubber Roof Installation West Covina, CA
- – Rv Roof Leak Repair West Covina, CA
- – Resealing Rv Roof West Covina, CA
- – Repair Rv Roof West Covina, CA
- – Repair Rv Roof West Covina, CA
- – Rv Rubber Roof Maintenance West Covina, CA
- – Rv Rubber Roof Maintenance West Covina, CA
- – Roof Repair For Rv West Covina, CA
- – Rubber Roof Installation West Covina, CA
- – Rv Rubber Roof Repair West Covina, CA
- – Rv Roof Maintenance West Covina, CA
- – OCRV Center
Replace Rv Roof West Covina, CA
I figured I prefer to have it semi-portable so I went with the canopy, plus this permits me to readjust the elevation backwards and forwards when I need to. Naturally the cheapest alternative of all would certainly be to just toss an excellent tarp over the top of your recreational vehicle for wet days and just job on bright days! Initially I elevated the legs with 1 1/2 PVC pipeline that fit inside the legs and after that I attached a tube clamp around the PVC pipe to hold up the cover legs.
This is still a little drooping. I possibly ought to have forked out for some rigid steel pipe from the beginning.
Cracks in the EPDM roofing at side of camper (West Covina Best Rv Roof Repair). An old spot job on the RV rubber roofing system. Loads of caulk loaded over old problem locations. As you can see, this roofing has actually had a great deal of issues throughout the years. Looking from the within the camper there have actually clearly been leakages in lots of areas of the roofing.
On the base is the initial EPDM rubber roofing system layer. I understand it's EPDM rubber and not TPO rubber because of the black backing. On top of my EPDM roof is a thin Recreational vehicle roofing layer that was used later on.
Resealing Rv Roof West Covina, CA
I just left the roofing system layer adhered to the EPDM roof and drew them up with each other. (You don't require to peel them up individually.) Beginning to peel off roof covering layer. Peeling up area of the bottom layer of rubber. This shows that the initial RV roofing was EPDM due to the black support.
All rubber roof covering removed from camper. There was a sticky under the lower layer of rubber that was still quite well stuck in numerous locations, but with a great little bit of pressure it peeled up cleanly.
If you assume you'll be conserving the roof covering decking plywood (not replacing it), then you could save yourself some cleaning trouble by eliminating the components initially and then peeling up the rubber! A lot more water damaged locations on Motor home roof decking.
Rubber Roof Installation West Covina, CA
I went for the most basic one initially, an air vent cap from a kitchen sink pipes air vent pipe. Starting to scrape caulk and sealant. I utilized a stiff scraper with a chisel-like blade and just began spying and chipping and scraping and hacking. There is no various other means around this, you simply have to start digging up until you reveal the screw heads.
Loosening the screws in air vent cap. The screws on this vent cap were hex-head steel screws so I made use of a small outlet vehicle driver to eliminate them.
I uncovered an old wasp nest inside the air vent cover. This is a sight I'll most likely have actually to obtain used to, finding the remains of animal habitation in every space and cranny. I spend a terrible lot of my time developing excellent wild animals habitat in my lawn so I don't get offended when an animal chooses to establish up home in my motor home.
Rv Roof Leak Repair West Covina, CA
Fortunately nobody was home in this old nest so I just threw it. You must try not to harm these pieces (like air vent covers and caps) as you're scraping off the old caulk and sealant just in instance you require to utilize them once again.
One down, 7 more fixtures to go. Next I made a decision to deal with the only roofing air flow follower that my camper has. My roof covering air vent likewise had a vent cover over it. I began scraping the substance from those screws. Starting on the roofing air vent. Hardware revealed on roofing vent cap, the initial nut came off clean.
Screw is spinning. The bolts on this recreational vehicle roof covering vent cover were nuts on tiny screws. The very first one came off great with an expansion socket package. The 2nd one just started rotating, suggesting the screw was not dealt with in place however turning along with the nut. Disappointment. A peek at the equipment holding down the roofing system vent cover.
Resealing Rv Roof West Covina, CA
I didn't have any type of good method to hold the screw in position so rather I chose to saw through the screws with a reciprocating saw. Sawing with screws on roof air vent cover. I made use of a cordless reciprocating saw with a metal-cutting blade yet it was challenging to obtain the blade level adequate to reach the bolts so near the roofing deck.
Flexing the blade a little bit to reach close to the roofing deck. Cover eliminated from roof vent.
I scratched extra caulk and roof sealer off the flange of the roofing vent itself. I quickly discovered there were no a lot more screws or hardware holding it down so I provided up on the scuffing and went inside the RV After scratching the caulk and sealant from flange of roofing system air vent, no more screws!
Repair Rv Roof West Covina, CA
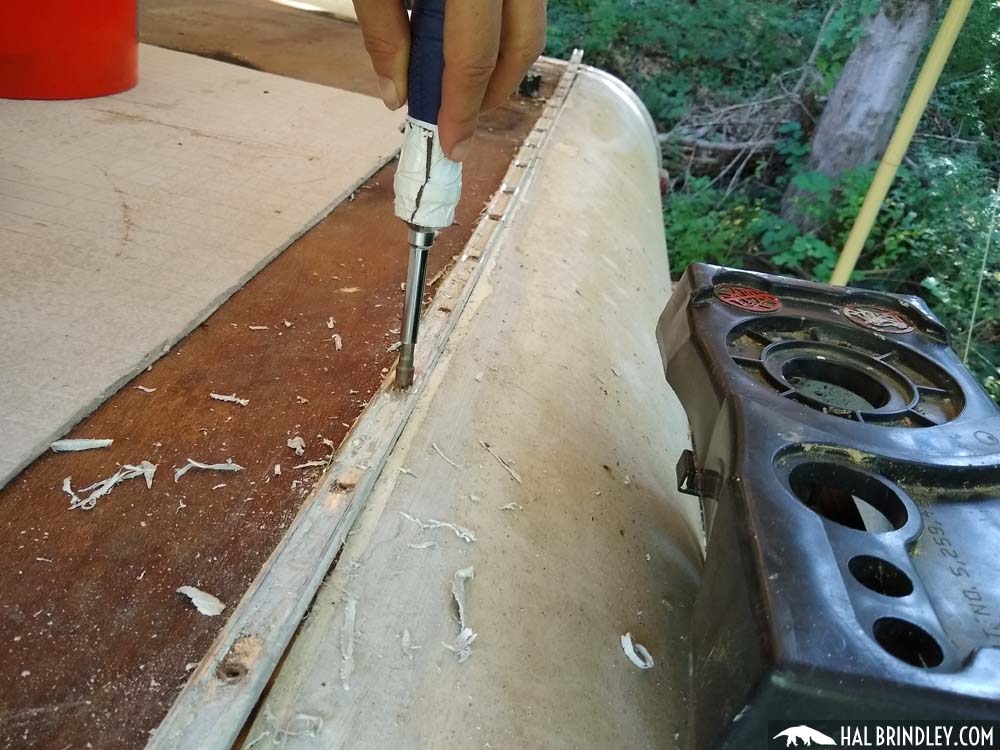
A pair sheared off with a whole lot of pressure, yet 2 wouldn't move. So I needed to drill out the screw heads. I chose a drill little bit near the size of the shaft of the screws that I had currently taken out and began boring. Picking a drill little bit for drilling out a screw head.
Rather of popping off the screw head, the plastic simply thawed away around the hot screw head. Hope I do not have to reuse this cover.
Once the braces were out I went back up leading to pry out the the roof covering air vent. There are two wires running to the roofing system air vent (a black hot cable and a white neutral wire) that you'll require to clip to eliminate the old vent (West Covina Best Rv Roof Repair).
Repair Rv Roof West Covina, CA
These are the cables connecting the roofing venting fan. I clipped them simply over heaven splice joints. Roofing system air vent eliminated and cleansed up. After clipping the cable and getting rid of the vent, I tidied up any kind of remaining goop and got my initial great check out the roofing system structure. It's steel! 1 1/2 inches thick.
Some recreational vehicle roofing systems are mounted with wood, others have steel framing. I had no idea what was in my camper till this factor. Not also happy regarding the quantity of rust on it, yet ideally it is still structurally appear! I scraped off some rust and made a large mess inside the restroom.
Oops. Possibly I need to have put a tarp down. My final goal of the day was to get the fridge air vent cover off. I noticed recreational vehicle sealer blobs at 4 factors on the cover so thought there should be screws under them. I tore them up and found Phillips screw heads.
Subjecting the screws in the fridge vent cap. Peeling off old motor home roof covering layer on top of fridge air vent cap I also saw that there was a layer of recreational vehicle roof covering coating over the vent cap. These layers are repainted on with a brush so plainly whoever did this finish simply blobbed in on top of every little thing.
Rv Rubber Roof Maintenance West Covina, CA
Taking off the cover of the fridge roofing vent. When the cap is off it's more of the exact same. Reducing away extra rubber and scraping off motor home roof sealer and old caulk. Obtain comfy because this sucker has 32 screws in it! Ugh. Scraping lap sealer and caulk from screw heads.
Prying off the fridge roof covering vent after all screws are eliminated. Nearly every screw was in good sufficient problem to get rid of with a socket driver, however a pair were too rusty and needed to be twisted out with vice hold pliers.
Rv Rubber Roof Maintenance West Covina, CA
I peeled the remaining rubber roofing from under the flange and after that scratched off the old putty under. I'll clean it better if and when I decide to reuse it. Feels like it remains in suitable form so I most likely will. Removing the old putty from the flange of the refrigerator roof air vent.
That's as much as I obtained on day 1 after regarding 5 hours of careless job. Over time, your Recreational vehicle's roof covering can become used, damaged, or create leaks, which can endanger its honesty and lead to even more substantial issues. If you're experiencing any of these troubles, it may be time to take into consideration replacing your RV roofing.
There are several indicators that suggest your RV requires a roofing replacement. These signs include water leakages, sagging or soft areas on the roof, cracks or divides in the roof product, excessive deterioration, and visible sunlight coming via the roofing. If you observe any one of these signs, it is critical to address them promptly to prevent further damage to your motor home.
Roof Repair For Rv West Covina, CA
On average, Motor home roof covering replacement costs can vary from $2,000 to $10,000. When choosing a Recreational vehicle roofing system product, several elements come right into play.
Choosing in between a do-it-yourself (DO IT YOURSELF) technique or professional installment for your RV roof covering substitute relies on your skills, experience, and readily available time. While DIY installation can save you cash, it needs adequate expertise and expertise to make sure a proper and watertight installation. On the various other hand, specialist installation offers the advantage of expertise, experience, and service warranties.
Evaluate and clean up the seamless gutters and downspouts to make sure correct water drainage and prevent water merging on the roof. Use a protective finishing or sealer to the roof covering surface as advised by the producer.
The expense of installing a Motor home roof can differ based on variables like Motor home size, selected roof material, and whether specialist installation is asked for. If your Motor home's roofing is damaged, worn out, or leaking, a roofing system replacement is usually required to make certain the architectural honesty of your Motor home.
Rubber Roof Installation West Covina, CA
Fixing a split in a Recreational vehicle roof depends on the intensity and kind of roofing system product. For small holes, you can use roof covering repair work tape or sealer specifically designed for Recreational vehicle roofs.
Buying a top quality RV roofing system coating can be worth it for long-lasting roof covering upkeep. Flex Seal products are commonly used as temporary or quick-fix solutions for small leaks or cracks. While they may give a momentary remedy, it's recommended to seek advice from with a professional and utilize proper motor home roof covering repair materials for a more permanent and trustworthy fix.
Rv Rubber Roof Repair West Covina, CA
Routine assessments and maintenance can help you recognize potential issues prior to they worsen. PVC roof coverings supply outstanding toughness, resistance to UV rays, and reduced upkeep needs. They are considered a reliable choice for RV roofings, but the ideal choice depends upon your particular needs and choices. Both EPDM and PVC roof coverings have their benefits.
Resealing your recreational vehicle roofing must be done consistently to preserve its stability and prevent leaks. As a general guideline, it's suggested to reseal your motor home roofing at the very least when a year or as per the manufacturer's suggestions. Whether to leave your recreational vehicle slides in or out relies on the situation and personal preference.
Consider variables such as security, weather, and ease when making the choice. Motor home roof leaks are reasonably typical as a result of numerous elements such as age, wear and tear, incorrect maintenance, or severe climate condition. Regular assessments and aggressive upkeep can help decrease the event of leakages. The decision to complete a motor home because of water damages relies on the level of the damage and the insurance policy company's analysis.
Rv Roof Maintenance West Covina, CA
Insurance policy insurance coverage for recreational vehicle delamination relies on the details policy and the reason of delamination. It is necessary to assess your insurance coverage and seek advice from with your service provider to recognize the coverage for delamination and any suitable deductibles. Claiming water damages on a camper relies on your insurance coverage and the conditions surrounding the water damage.
Roof Repair For Rv West Covina, CARv Rubber Roof Repair West Covina, CA
Motorhome Roof Replacement West Covina, CA
Rv Roof Repair West Covina, CA
Repair Rv Roof Leak West Covina, CA
Rv Roof Repair Fiberglass West Covina, CA
Rv Trailer Rubber Roof Repair West Covina, CA
Repair Rv Roof Leak West Covina, CA
Rv Slide Out Roof Repair West Covina, CA
Resealing Rv Roof West Covina, CA
Class C Rv Roof Repair West Covina, CA
Rv Trailer Roof Repair West Covina, CA
Rv Roof Leak Repair West Covina, CA
Rv Roof Leak Repair Near Me West Covina, CA
Rv Roof Repair West Covina, CA
Rv Rubber Roof Replacement West Covina, CA
Rubber Roof For Rv West Covina, CA
Rv Roof Maintenance West Covina, CA
Rubber Roofing For Campers West Covina, CA
Rv Rubber Roof Repair West Covina, CA
Rv Roof Repair Fiberglass West Covina, CA
Rv Roof Repair West Covina, CA
Rubber Roof For Camper West Covina, CA
Rubber Roof For Rv West Covina, CA
Rv Roof Repair West Covina, CA
Rv Slide Out Roof Repair West Covina, CA
Rubber Roof For Rv West Covina, CA
Rv Rubber Roof Replacement West Covina, CA
Rv Roof Repair West Covina, CA
Rubber Roof For Rv West Covina, CA
Rv Rubber Roof Replacement Cost West Covina, CA
Resealing Rv Roof West Covina, CA
Repair Rv Roof Leak West Covina, CA
Rv Roof Leak Repair Near Me West Covina, CA
Rubber Roof For Camper West Covina, CA
Rv Fiberglass Roof Repair West Covina, CA
Rv Roof Replacement West Covina, CA
Rv Rubber Roof Replacement Cost West Covina, CA
Roof Repair For Rv West Covina, CA
Rv Rubber Roof Replacement Cost West Covina, CA
Rv Roof Repair Near Me West Covina, CA
Rv Rubber Roof Replacement West Covina, CA
Rv Roof Repair Near Me West Covina, CA
Rv Roof Leak Repair West Covina, CA
Rubber Roof For Rv West Covina, CA
Best Rv Roof Repair West Covina, CA
Epdm Rv Roof Repair West Covina, CA
Rv Roof Leak Repair West Covina, CA
Rv Roof Replacement West Covina, CA
Rv Roof Leak Repair Near Me West Covina, CA
Epdm Rv Roof Repair West Covina, CA
Rubber Roof Installation West Covina, CA
Resealing Rv Roof West Covina, CA
Rubber Roof For Rv West Covina, CA
Rv Roof Repair Service Near Me West Covina, CA
Class C Rv Roof Repair West Covina, CA
Rv Roof Repair Service Near Me West Covina, CA
Rv Roof Leak Repair West Covina, CA
Rubber Roof Installation West Covina, CA
Repair Rv Roof West Covina, CA
Best Rv Roof Repair West Covina, CA
Rv Roof Maintenance West Covina, CA
Epdm Rv Roof Repair West Covina, CA
Class C Rv Roof Repair West Covina, CA
Rv Roof Repair Near Me West Covina, CA
Rv Slide Out Roof Repair West Covina, CA
Motorhome Roof Replacement West Covina, CA
Rv Roof Repair Service Near Me West Covina, CA
Rubber Roof Installation West Covina, CA
Rv Fiberglass Roof Repair West Covina, CA
Rubber Roofing For Rv West Covina, CA
Rv Roof Maintenance West Covina, CA
Rv Roof Maintenance West Covina, CA
Rv Roof Repair Near Me West Covina, CA
Rubber Roof Installation West Covina, CA
Rv Roof Repair Near Me West Covina, CA
Rv Rubber Roof Replacement West Covina, CA
Rv Roof Leak Repair Near Me West Covina, CA
Find A Good Seo Management West Covina, CA
Close To Seo Consultant West Covina, CA
OCRV Center
Table of Contents
- – Replace Rv Roof West Covina, CA
- – OCRV Center
- – Resealing Rv Roof West Covina, CA
- – Rubber Roof Installation West Covina, CA
- – Rv Roof Leak Repair West Covina, CA
- – Resealing Rv Roof West Covina, CA
- – Repair Rv Roof West Covina, CA
- – Repair Rv Roof West Covina, CA
- – Rv Rubber Roof Maintenance West Covina, CA
- – Rv Rubber Roof Maintenance West Covina, CA
- – Roof Repair For Rv West Covina, CA
- – Rubber Roof Installation West Covina, CA
- – Rv Rubber Roof Repair West Covina, CA
- – Rv Roof Maintenance West Covina, CA
- – OCRV Center
Latest Posts
Diamond Bar Rv Interior Furniture
Motorhome Collision Repair Near Me Chino Hills
Sun Valley Central Air Installation
More
Latest Posts
Diamond Bar Rv Interior Furniture
Motorhome Collision Repair Near Me Chino Hills
Sun Valley Central Air Installation